Showing posts with label makeup. Show all posts

Monday, June 3, 2013

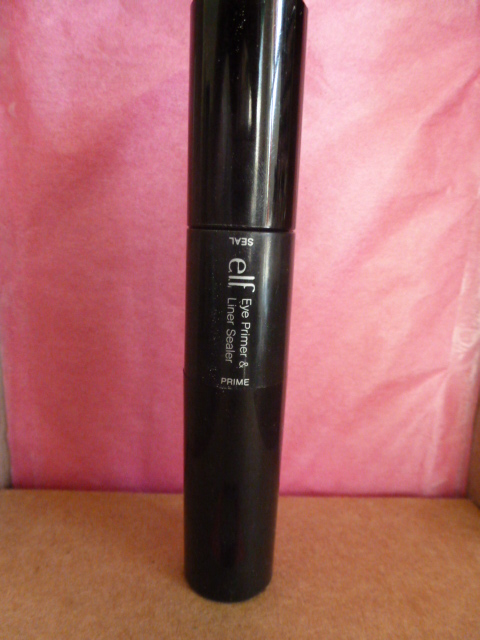
Review: e.l.f. 2-in-1 Eye Primer and Liner Sealer

This is one of the products I picked up on my congratulatory makeup binges.


I already have a primer that came with one of my eye shadow palettes, but I figured that having a dedicated primer couldn’t be a bad idea. I picked up this, the lightest shade available at my Target. Needless to say, my Target was pretty wiped out of e.l.f. products.

However, despite the shade disparity, this is a pretty decent eye primer. It feels pretty thick and stays on for ages. In fact, removing it is a bit of a hassle.

It has completely solved the issues of staying power with my eyeshadows. I can apply an eyeshadow over this and it will stay put for 12 hours. No creasing, no fading, nothing. Just great color that lasts and lasts. No complaints on that end!

Application is a bit…difficult. The consistency is decent, but a little waxy. It makes putting it on just this side of painful. It’s also a little tough to got uniform coverage. Because really, it all depends on how hard you press where. It can also be a bit painful to rub this all over your eyeball.

I discovered that the best way to apply this was to basically outline my eye. Then, I do a line along the crease. Then I blend it all in with my fingertips. That way, I get smooth coverage and it’s not so thick that it feels sticky.

You could also use a sponge eyeshadow applicator to apply this, which is how I apply my other primer.

Overall, this isn’t a terrible product. It does its job to a tee. It’s just the application that makes this a pain. But for the price of $6, I’m super satisfied..


Thanks for reading!

Tuesday, May 28, 2013

Review: e.l.f. Tone Correcting Concealer

I bought this little tube on one of my “I have a new job” makeup binges. I figured that it was a dollar, and I was willing to put my concerns about finding a perfect shade aside for that price.

I’m pretty glad I invested in this product!

 
At a dollar, the tube is relatively small and it’s not filled with a lot of product. But that’s perfectly fine, because I don’t need much to cover up my under-eye circles and blemishes. A little, for this concealer, goes a very long way.


This was one of the lightest colors available at my Target and it’s still a tad on the dark side. To be fair, though, pretty much everything is do dark on my skin. Once blended, it’s pretty seamless, but I could probably drop a shade or two.

This is a nice concealer for the price, though. It has pretty decent coverage. It won’t cover up my freckles, so it’s not as heavy duty as I know some people like, but it can help even skin tone and make your skin look even more flawless. It’s good at reducing the appearance of blemishes and dark circles. And really, that’s only what I use it for. The dark circles, especially.

It’s a little on the thick side, formula wise, despite the light coverage. You can definitely feel that it’s there for about half an hour after application. After that, the sensation fades, and it’s just like normal skin.

This also does well with a tiny bit of foundation on top and a touch of powder to help mattify it.
Other than that, for a dollar, it really can’t be beat.


Thanks for reading!

Monday, March 11, 2013

March Birchbox - Benetint

Yay! It's Birchbox day!

My box is pretty amazing this month, and I'm super excited to try everything in it.

First, though, is this wonderful piece of amazing:


I had been hoping that I would get Benetint in my Birchbox, and I squealed when I saw it nestled in amongst everything else!

This is the lip and cheek stain that I have been lusting after for like...ever. Seriously. This stuff is supposed to be utterly amazing. And I'm going to tell you now that it doesn't disappoint.

The brush is pretty nice. Just kinda standard for a high quality lip stain. This is nice and firm, though, which is great. And it's a lot better than the marker-like applicator that a lot of lip stains use.

And this, ladies and gents, is the awesomeness (with a coat of beeswax lip balm on top). Now, I'm super pale, and my lips kinda match that. Not bad, eh?

Here's the best part: It doesn't sink into the cracks in my lips!! Normally, with lip stains, I have this terrible problem where it looks like I'm bleeding profusely from my cracked lips. Chapstick doesn't help, balms don't help, scrubs only help minimally. I'm still searching for something that will cure my horrible lips. And with stain, balm or no balm, they just...look bad. 

This stuff, though, doesn't seem to do that as much as all of the others. Maybe it's the ingredients, the way it soaks in, the better color. Whatever it is, it makes me very, very happy. 

Note: It could do with some balm or chapstick on top. It doesn't moisten your lips (it's not supposed to, really), so mine were a little dry after application. But that's an easy problem to solve. 

Also, I've been wearing this for almost an hour now, and there is no fading, no cracking, no peeling. Just nice, subtle color. I know that this is really buildable, but the great news is that the picture is with just one tiny, itty bitty bit. Isn't that amazing! 

I know for a fact that this going to be a full size purchase. Because it is already worth every penny. 

Thanks for reading, and I'll have more goodies to post tomorrow!

Sunday, March 3, 2013

Tricks and Tips : Blush

Here's a confession: when I started out with makeup, I made so many mistakes. Aw, who am I kidding? I still do! Almost every day, in fact. I do something that could be better. I have to go back and fix something I messed up on.

My biggest problem? Blush.

It took me ages to figure out how to put on blush so that it didn't look like I had put on blush. My blush was always too red, too much, to weirdly applied. And for years, I didn't wear any. I bought blush, would try it, look horrendous, and would just wash my face and go out bare faced.

After some practice (and buying a decent brush), I finally have it down.

Well, a little.

First off, you need a decent blush brush. At first, I denied this. I thought that a makeup brush is a makeup brush and I didn't want to spend tons of money on a tool. I couldn't tell the difference between a powder brush, a foundation brush, or a kabuki brush. But then I learned that, actually, the right brush can make a world of difference.

This is the blush brush that I use now. It's just the basic powder brush from Sally Beauty. 

Notice: the bristles are soft and fluffy, so application isn't too concentrated.

And here's the difference between the one that comes with blush (small, stiff) and the brush that I prefer. You can see how distinct it is. And how even that brush can make a difference.

Big secret: You don't have to spend tons and tons of money to find the right brush. The blue beauty up there? Less than a dollar at Sally's. If you have the money to blow on the best of the best tools, then fine. But for me, and for people who are just getting started, there's really no need. There are good, affordable brushes out there that can help when you're just starting out.

And honestly, I'm not a makeup artist. I'm just an average girl. I don't need the absolute best brushes because I put on makeup once a day, not 50 times a day on different people.

Basically, figure out what price range is best for you and start out small. 

Trick number two: a dry makeup sponge is your best friend for blush. 


This is the back side of my makeup sponge. Notice how red it is. 
The trick is, if you apply too much blush or the color is uneven, use a dry makeup sponge to drag the color upward. Start at the bottom of the area, and then gently use the sponge to move up toward the apple of your cheek. Once you have most of the color smudged off, you can gently pat the back of the sponge back towards your jaw line to blend. 

If done right, the sponge will pick up a good bit of the excess blush. That way you won't look like you've just been slapped. You'll look fresh faced and warm. 

It takes a bit of practice to get this technique down pat, but I think that knowing how to correct mistakes is half the battle with anything. 

Good luck and thanks for reading!


Tuesday, January 29, 2013

Making Your Own Makeup

If you're at all into beauty, you know that one of the big deals right now is to have a tinted moisturizer or a tinted primer under all the other stuff.

But here's a big secret: I don't wear primer. Ever. I am lucky enough to have skin that holds onto makeup all day with little need for refreshing. For those of you who have oily skin or skin that just can't seem to like makeup, primer is a good choice.

The problem is that it can get a little pricey.

And for me, my moisturizer is pretty expensive as well. After all, I use an all natural moisturizer with no parabens or artificial chemicals. And the cost of natural is high.

So when I read about a brilliant way to stretch that moisturizing dollar, especially during the winter months when I have to slather it three or more times a day, I was so totally game.

And now, I'm going to share that tip with you guys.

The trick to make expensive moisturizers last longer without decreasing their effectiveness is this: make your own tinted moisturizer.

That's right. And you want to know what? It's really not that hard. In fact, I can make a small pot of mine every morning and it only adds about 30 seconds to my routine time. Which is always a plus when I'm in a hurry (which is every day).

Here are some tricks that I've picked up on since starting this.

First, use a healthy amount of moisturizer. Use a little less than what you would use on your face.

I found that this spare contact case that I had floating around was the perfect size to hold one or two days worth of my handmade tinted moisturizer. Making it that often keeps it fresh so you aren't using stale makeup on one of the most sensitive areas.


Next, add about the same amount of liquid foundation as you would use on any given day. Use more if you want more coverage, but generally, this amount is just right.

And last but not least, stir! Make sure that all of the moisturizer is mixed in with the foundation, and you don't have any spots where one is more concentrated than the other. That will cause streakiness and uneven placement of the makeup.

 Now, when you use this, not only are you making your foundation winter ready by adding moisturizing capabilities, but you're stretching out how much moisturizer you use in the morning by making your makeup do double duty.

Mixing in your moisturizer will make sure that your makeup stays longer by helping it soak into the skin. It looks sheerer and more natural, and using it this way makes it nearly impossible to get that icky cakey skin look.

When I first started getting into makeup, I was terrified of looking like I was wearing makeup. You know those people. The ones who look like they have a pound of makeup covering their skin, which only makes their flaws that much more noticeable.

My foundation wasn't really getting used until I started mixing it with my moisturizer because it felt so heavy. Even a good foundation can feel heavy for me. But this makes it light and comfortable. Sometimes, I'll have to get out of bed at night because I forgot that I was wearing makeup and so hadn't taken it off. Most people don't even know I'm wearing makeup. They just think I look airbrushed naturally. Which, hey, no complaints here!

Try out your own combinations and let me know how it works out for ya!

Thanks for reading!

Tuesday, January 15, 2013

Setting Up Your Meez!

Five internet points if you get that reference.

For those of you who don't, it's a food service phrase. What I'm talking about is your mise en place. It's a term for your work area, the particular arrangement of food/herbs/prep items that is arranged just the way you like it. It's a sacred space and you risk bodily harm by messing up someone else's mise.

Why am I talking about food service on a beauty blog?

Because mise en place isn't just for the kitchen (or in my case, the coffee shop).

One of the best things to do with your makeup and skincare regimen is set it up in some way that it will be used. Because if it's not organized, or something gets shoved to the back of drawer, or you have to search for that cool sample a friend gave you, you're never going to like getting into makeup. It's going to feel like a chore, and that's just awful.

Trust me on this one. For most of college, I didn't wear makeup because it meant dragging my makeup bag out from the counter, digging out what I needed, putting it on, cleaning up the (shared) bathroom, and then throwing everything back in the bag for the next time. And I just wasn't feeling it. I was lazy and busy and anything that took more than a few minutes didn't make it into my schedule.

That didn't really change once I graduated college and got my own place. I have tons of sample shampoos and conditioners that I haven't tried because they're somewhere in the depths of my sink.

So, I said all of that to say this: Set. Up. Your. Station. I don't care if you live in a tiny flat in New York or a sprawling house on the West Coast. Find a corner, claim it, set up a flag, and then start building your makeup stash from the ground up.

Here, for starters, I'll show you mine.

This is one of my reused Birchboxes, which I use to hold all of my main ingredients. Everything is easy to reach, although it looks a little cluttered. 

This is the top of the above Birchbox, which I use to hold my eye shadow. I have more eye shadow palettes than anything else, so I like them to have their own container.

This is the top drawer as a whole. It looks crowded, but everything has its own place so that my routine is cut from infinite minutes to about ten. Which is useful when I'm rushing off to work or run errands.

This is the top of my sewing/makeup table. Everything that I use really often is up here, including my box of BPAL perfumes and lotions (I have such dry skin, guys). I also have a mirror, a good desk lamp, makeup removal towlettes, and a spritzer of water.

I know, I know, my collection isn't much. But it's growing. And if you're just starting out and you're looking to make a habit out of this whole prettifying thing, you're going to need your goodies set up for success.

Wow, I sounded like a high school counselor for a second there. Sorry about that.

Having your own little corner (complete with an outlet) is also great if you don't have your own bathroom or, like me, you share that bathroom with a man who wouldn't know foundation if he was bathing in it.

That's it for today. In case you can't tell, I'm starting with basics and going from there. Also, there is a cat on my lap demanding attention. Who am I to deny him?

Tomorrow, a review of a Zoya nail polish (not a new one, but it comes with a story, so there's that).

Thanks for reading!

Sunday, January 13, 2013

Birchbox January 2013 - Eyeko Eyeliner and theBalm Hot Mama


This is a twofer because I don’t have a lot to say on the Eyeko eyeliner.
 
It is a very pigmented black liquid liner with an “easy” pen applicator. It goes on super smooth, and I admit the pen tip looks like it would make life easier. However, I have the absolute worst trouble with eyeliner. I can’t seem to put it on without making the line jagged, shaky, broken up, and far too wide. I don’t know what I’m doing wrong, but I’m hoping to figure it out soon because I really like the looks of this eyeliner. Hopefully I can use it in the near future and I’ll be able to provide a better review. As it stands, I don’t have the skills to apply eyeliner properly. 
This all in one is another story completely. I only one one shade of blush, and that’s the Bare Minerals Ready shade Natural High. I like it, despite it’s hint of shimmer (I’m not a big fan of shimmers). 
So when this came I didn’t quite know how to feel about it. It looked a little too peach, a little too shimmery. But I tried it. And you know what?
I love it! The shimmer is just right and the color? Nothing to be worried about. It makes me look like I’m positively glowing. I don’t know that I’ll be wearing this a lot until it gets a little warmer (I heard on the interwebs that golden shimmers should be kept for warmer months), but I know once the sun comes out, this is will be awesome! I put a little on the apples of my cheeks and then a touch on my nose, forehead, and jawline. It makes me look like I went out in the sun yesterday, which is nice considering I haven’t seen healthy amounts of daylight in forever. 
This is definitely something I will be buying once the (generous) sample runs out. 
So happy!