Showing posts with label Beauty. Show all posts

Sunday, March 3, 2013

Tricks and Tips : Blush

Here's a confession: when I started out with makeup, I made so many mistakes. Aw, who am I kidding? I still do! Almost every day, in fact. I do something that could be better. I have to go back and fix something I messed up on.

My biggest problem? Blush.

It took me ages to figure out how to put on blush so that it didn't look like I had put on blush. My blush was always too red, too much, to weirdly applied. And for years, I didn't wear any. I bought blush, would try it, look horrendous, and would just wash my face and go out bare faced.

After some practice (and buying a decent brush), I finally have it down.

Well, a little.

First off, you need a decent blush brush. At first, I denied this. I thought that a makeup brush is a makeup brush and I didn't want to spend tons of money on a tool. I couldn't tell the difference between a powder brush, a foundation brush, or a kabuki brush. But then I learned that, actually, the right brush can make a world of difference.

This is the blush brush that I use now. It's just the basic powder brush from Sally Beauty. 

Notice: the bristles are soft and fluffy, so application isn't too concentrated.

And here's the difference between the one that comes with blush (small, stiff) and the brush that I prefer. You can see how distinct it is. And how even that brush can make a difference.

Big secret: You don't have to spend tons and tons of money to find the right brush. The blue beauty up there? Less than a dollar at Sally's. If you have the money to blow on the best of the best tools, then fine. But for me, and for people who are just getting started, there's really no need. There are good, affordable brushes out there that can help when you're just starting out.

And honestly, I'm not a makeup artist. I'm just an average girl. I don't need the absolute best brushes because I put on makeup once a day, not 50 times a day on different people.

Basically, figure out what price range is best for you and start out small. 

Trick number two: a dry makeup sponge is your best friend for blush. 


This is the back side of my makeup sponge. Notice how red it is. 
The trick is, if you apply too much blush or the color is uneven, use a dry makeup sponge to drag the color upward. Start at the bottom of the area, and then gently use the sponge to move up toward the apple of your cheek. Once you have most of the color smudged off, you can gently pat the back of the sponge back towards your jaw line to blend. 

If done right, the sponge will pick up a good bit of the excess blush. That way you won't look like you've just been slapped. You'll look fresh faced and warm. 

It takes a bit of practice to get this technique down pat, but I think that knowing how to correct mistakes is half the battle with anything. 

Good luck and thanks for reading!


Tuesday, February 19, 2013

Why I Wear Makeup

For my first post in a week (sorry, work has been crazy), I've decided to touch on something that a lot of my close friends have commented on.

As I have said, I used to not be into makeup. Not by a long shot. Usually, I wouldn't even try to cover up blemishes. I just hid them behind bangs, hands, or scarves.

And when I started this blog, a lot of people I know were a little skeptical. Me? Makeup? But do you even wear makeup? Why do you wear makeup? You have such nice skin, you don't really need it.

But here's the thing: I'm really self conscious. I get nervous easily, I get anxious and doubt myself all the time. That's part of living with an anxiety disorder, no matter how mild. And honestly, it makes life tough. I remember crying after my first job interview because I bombed it because of my nerves. I remember shaking so hard during the interview that the chair rattled.

For some reason, when I wear makeup, that seems to go away. I feel confident. Sexy. Strong. Sure of myself.

I'm not covering anything up. Heck, if anything, you guys have seen that my makeup is light and thin and barely noticeable. But what my makeup does is make me feel like I'm putting my best face forward.

On those days when I have the time to look awesome. Spend a few minutes on myself, rather than sacrificing for those around me...well, it's a big deal. It's something that is purely for me. Making myself happy, rather than trying to please those around me.

Makeup is something that makes me feel like I'm really me. Like I love myself more every day.

And really, that's something that's rare today. Lots of women hate themselves. They don't feel confident. They don't love their bodies, no matter what size or shape they are. They want to be airbrushed, perfect by magazine standards, not realizing that they're already perfect.

And even just a tiny amount of makeup reminds me that I am beautiful. Especially when I take the time to love myself. To look in a mirror, even when I have a zit the size of Texas, and say, "Damn. I'm beautiful!"

On those days when I don't wear makeup, I can feel the difference. The same way I can feel the difference when I spend the day wearing my work clothes (black on black) and when I have the chance to wear a bright fuchsia shirt that shows off my curves with a pair of nice pants that makes my butt look amazing.

There's something about looking your best that can change you. And when you're as anxious as I am, that's a big deal. Looking my best ensures that I feel my best.

So, yeah, makeup isn't for everyone. But it might be for a lot more people if they knew how to apply it to emphasize their natural beauty. If they could get past what my first thought was: that makeup is to cover up and hide behind.

 I want all of my readers to know that makeup isn't for hiding behind. Makeup is for helping you to take a step forward and say, "Here I am! I'm ready to take on the world!"

Thanks for reading this text post. I just felt the need to get my feelings on the matter out in the open. Feel free to let me know why you wear makeup in the comments!

Wednesday, February 13, 2013

DIY Lip Scrub

Remember when I told you the internet is your friend when it comes to trying something new?

Well, this is yet another instance where  that is proven to be true.

You see, I wanted a lip scrub. I desperately need one year round because I'm the type of person that forgets chapstick. I also lick my lips constantly and never drink enough water. Needless to say, my lips are pretty much always in a state of dryness and in desperate need of exfoliation.

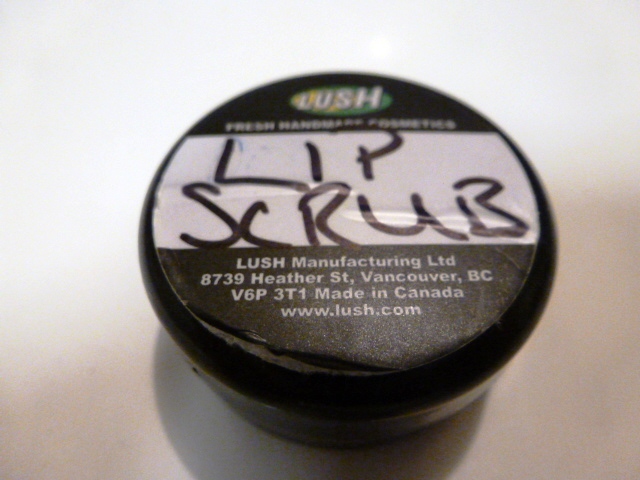
I found some awesome lip scrubs at Lush, but they were messy and expensive. If you have the money, they are a great investment. But the scrubs, made mostly of sugar, flavor, and some vitamins, still wouldn't solve the problem of my chapped lips.

To my rescue, Pinterest! I searched until I found one that used items I had in my pantry. After all, what's the point of saving money by making a DIY if you have to spend an arm and a leg on the product to make said DIY?

You can find this recipe anywhere, but here's my version.

You'll need: Coconut oil, honey, and sugar (I used turbinado sugar). Seriously. That's it.
First, you will need a small container. I've heard of people using baby food jars, washed out tea tins, and the like. I choose to make my lip scrub in much smaller batches. Here, I re-purposed an empty sample container from (well, would you look at that) Lush. 
Here is the completed, refrigerated product.

And a pile of the sugary (delicious) scrub on the tip of a nail.

My recipe, you ask? My method? Well, to tell you the truth, I didn't really follow one. Sure, the first time I did. But I thought it was way too much scrub for me, there wasn't enough sugar, and there was way too much honey.

So I played around a bit until I got it exactly the way I wanted it. I added the sugar first, then the warmed up coconut oil, then the honey. I kept working in small increments until it was just what I wanted.

And that's okay! You can find a recipe and then tweak it to your liking. That's the great thing about DIY: it's completely customizable. Hate coconut oil? Find another oil that you do like. Want some vitamin E? Sure, break a caplet in there. Add some flavor extracts, some color. Whatever you know will work with your body, your skin, your preferences. 

In the end, that's why makeup is awesome. There aren't really hard and fast rules (well, not really). It's all figuring out what works for you. 

Isn't that the best?!

Tuesday, February 12, 2013

Birchbox February 2013 - Beauty Protector

I've been looking for a heat protectant spray for what feels like forever. I've only recently started styling my hair (and in fact, only bought my first hair dryer a couple of weeks ago), so I didn't know where to start. Like BB Creams, it feels like there is a glut of product to protect your hair on the market. Everything ranging from leave in conditioners to styling products to hardcore shampoos.

I was about to purchase a spray from Birchbox when this awesome little solution rolled into my mailbox.

 This is a long list of uses, but let's start at the very beginning (a very good place to start).

Detangler? Yes. It's as simple as that. I rarely condition my hair, and I only wash it once every couple of days, so it's great for detangling when I haven't conditioned.

Thermal protector? Sure seems so. I used it a couple of days ago when I used my brand new blow dryer, and my hair didn't feel frizzy or damaged at all. Which is nice, because I love my hair and I treat it like it's some diamond from another planet. Seriously. One day I'll tell you about my hair care routine.

Alright, the list is too long for me to go over every item. But it definitely makes my hair shiny. It's not greasy in the slightest. It doesn't weight my hair down. So yeah, it seems like all of the important ones are taken care of.

But my favorite part? It smells amazing. Like fresh coconuts and just a hint of something beachy. It's fresh, not heavy, clean, not sugary. And it doesn't overpower my perfume. I just notice it every now and then when I turn my head.

I have noticed one thing, though. If you don't comb it through very well, you're bound to wind up with some "crunchy" spots. Some spots where you hair is really stiff. It combs out, though, so it doesn't make me want it any less. You just have to be careful with not spraying it too concentrated.

And just cause I took the pictures, here are some of my hair with this stuff in it. Freshly washed, not conditioned, and not all the way dry. And no, I'm not wearing makeup. I just got out of bed and got showered to write these blog posts.


Thanks for reading!

Birchbox February 2013 - Dr. Jart BB Cream

I have been looking for a BB cream everywhere. I'm super into Korean culture, so several years ago, I started looking. But at that time, they were nowhere to be found. Now, it seems like the market is over saturated with this miracle product. Every company has their own version, with its own benefits and formulas and spokespeople.

It's intimidating to say the least.

So when I got this Birchbox sample, I was super excited. Not only was it a well renowned BB cream, it's a Dr. Jart BB cream. And for those who don't know, Dr. Jart was one of the first big brands. It went from nothing to household name really fast in Korea.

I was really excited to try it. Unfortunately, I was a little let down. Not by the product, though.

The sample size was small, but adequate.

And here you see my problem. I am very, very pale. Especially now, in the middle of winter. This color was a good deal too dark for my skin color. However, I traipsed forward to eek out a decent review.

Here, you can see that even rubbed in, the color difference is very distinct. 

Despite the color striation on my hand, I left that there all day. It had good staying power, I'll give it that much. But as you might have noticed, I prefer sheerer makeup. I don't really have problem skin (and this product is aimed towards that market). So Dr. Jart's BB Cream was a little too full coverage for me. 

It was creamy, and thick, which some people might like. But it's not really up my alley. 

However, it did leave my skin moisturized and soft. And eventually I stopped noticing how heavy it felt. I can see how this would be a great product for someone who wants full coverage makeup without looking greasy or cakey. After all, the cream gave my skin a nice matte finish. And it blended in nicely.

I just wish I could have tried it with a color that matched me. 

Thanks for reading!

Saturday, February 9, 2013

Birchbox February 2013 - Juicy Couture

Juicy Couture Perfume - Couture La La

Birchbox describes this scent as "a stunning mix of mandarin, red currant, lily, and orange blossom." And you know what? It is stunning.


Ok, as you guys have probably noticed, I’m super picky when it comes to perfume. My skin is finicky, for starters. It amps certain notes and then completely masks others. So I’m always a little hesitant when I try “mass market” perfumes. Especially this one. I saw all of the floral notes and was worried that I would smell like baby powder (which is how floral and I usually end up together).

But this perfume…this is a real winner. Even with my weird body chemistry, it smells fabulous. Mellow and sweet and subtle, with a touch of something that seems a little like amber and vanilla had a love child. A really great lovechild.

The smell is not cloying. It is delicate and feminine, which is exactly what the description on the package proclaims.

Props to Juicy Couture for making a mass market perfume that doesn’t make me want to run for the hills. In fact, I could see myself running out of the sample and buying a full bottle.

This is a great scent for spring. And oh man, Valentine’s Day. Perfect for Valentine’s Day.

It is womanly without being over the top, and young without being childish. Romantic. Sweet. Sexy. I'm absolutely impressed. 

Hooray for delightful scents!


Wednesday, February 6, 2013

Polish Review: China Glaze Pull Me Close

Now, this isn't my first time working with China Glaze's Magnetix line. I have two of the polishes, and really like them. Even without the magnet art, they are nice metallic colors.

However, on a recent trip to Sally's Beauty Supply, I happened to see the new Magnetix II magnet. So I picked it up (on sale, might I add) and decided that today would be a fine day to give myself a manicure.

Here's my review of the new magnets and an official review of Pull Me Close.


Pull Me Close is a nice magnetic blue-toned grey polish. The color is slightly streaky, but manageable. The formula is what you would expect from China Glaze: pretty awesome. You can get near opacity in one coat, but I would recommend two for using the magnet. It makes sure there is a nice base so there are no bald patches. 

As for the magnet...I'm impressed. As some of you who are into the nail polish world will remember, China Glaze got slammed for its first magnet. The little U-shape has three magnets, which is awesome, but they were really, really weak. You would have to hold your nail steady under the magnet for upwards of 30 seconds, and sometimes even longer. And even then, the design wasn't really as eye-catching as we were all hoping. 

They seem to have solved that problem with the Magnetix II magnets. These aligned the metal in the polish in about 3 seconds, and the designs, as you can see, are very distinct. The designs are also something that I haven't seen a lot of in other brands. The circles look fabulous in person. Just as stunning as in the pictures, and maybe even more so. I can't stop staring at my nails. 

I know, without a doubt, that I am going to get tons of comments at work. With the ripples looking 3D, the effect is undeniably gorgeous. 

China Glaze really renewed my faith in them, and I know I'm going to be picking up more magnetic colors to use with this new set of magnets.

Fun fact: If you go to Sally's they might still have more of these magnets. I got this bar (which usually runs at around $3.99) for $.79. Seriously. 

Thanks for reading!

Old Polish Review: Zoya Shawn Ombre Manicure

Today is going to be an old polish review from my Tumblr, but it's pertinent to today's story (I'm a creative writer at heart, so there're going to be a lot of stories).


That right there is my first ever ombre sponge manicure.

The base is Zoya Shawn, a delightful forest green creme. This polish color was one of the first I bought from Zoya, and it's what got me addicted to their brand. The formula is smooth and perfect and self leveling. The color is rich. I got tons of compliments on this color whenever I went out to run errands. People were amazed at how distinctive it was.

Then, I added to the style of the manicure by putting drops of China Glaze Champagne Bubbles on a makeup sponge and dabbing it onto my tips. It created an excellent effect that would be great for the holidays, or St. Patrick's Day, or really any other time (because it's just that pretty).

This manicure was really a big part of me stepping out of my comfort zone and trying something new. And you know where I learned it?

The internet.

I'm here to tell you that while the internet can be full of mean weirdos with nothing to do but offend other people, there are high points as well. I saw this style of manicure on Pinterest and saw how easy it was. It seemed a lot better for me to handle than the drops-of-polish-on-paper-and-then-sponge style. Which, by the way, I still haven't mastered. At all. It always blends into one awful color.

This, however, was fast and simple and something that I have repeated over and over again with different color combinations.

The internet is your friend for trying new things. It really is. Because when it comes down to it, there's probably someone out there who has done what you want to do and made a video/wrote a tutorial about it. And following someone's instructions is easier than going wildly into the great beyond with no navigation system whatsoever.

So, go find a tutorial on something you're interested in. Recreate it. See if you like it. If you do, CONGRATULATIONS! You've just took one step beyond your beauty bubble. If you don't, then at least you tried and you still stepped outside of your comfort zone. No matter what, you're more knowledgeable than you were before, and knowledge is the enemy of fear!

Thanks for reading!

Tuesday, January 29, 2013

Making Your Own Makeup

If you're at all into beauty, you know that one of the big deals right now is to have a tinted moisturizer or a tinted primer under all the other stuff.

But here's a big secret: I don't wear primer. Ever. I am lucky enough to have skin that holds onto makeup all day with little need for refreshing. For those of you who have oily skin or skin that just can't seem to like makeup, primer is a good choice.

The problem is that it can get a little pricey.

And for me, my moisturizer is pretty expensive as well. After all, I use an all natural moisturizer with no parabens or artificial chemicals. And the cost of natural is high.

So when I read about a brilliant way to stretch that moisturizing dollar, especially during the winter months when I have to slather it three or more times a day, I was so totally game.

And now, I'm going to share that tip with you guys.

The trick to make expensive moisturizers last longer without decreasing their effectiveness is this: make your own tinted moisturizer.

That's right. And you want to know what? It's really not that hard. In fact, I can make a small pot of mine every morning and it only adds about 30 seconds to my routine time. Which is always a plus when I'm in a hurry (which is every day).

Here are some tricks that I've picked up on since starting this.

First, use a healthy amount of moisturizer. Use a little less than what you would use on your face.

I found that this spare contact case that I had floating around was the perfect size to hold one or two days worth of my handmade tinted moisturizer. Making it that often keeps it fresh so you aren't using stale makeup on one of the most sensitive areas.


Next, add about the same amount of liquid foundation as you would use on any given day. Use more if you want more coverage, but generally, this amount is just right.

And last but not least, stir! Make sure that all of the moisturizer is mixed in with the foundation, and you don't have any spots where one is more concentrated than the other. That will cause streakiness and uneven placement of the makeup.

 Now, when you use this, not only are you making your foundation winter ready by adding moisturizing capabilities, but you're stretching out how much moisturizer you use in the morning by making your makeup do double duty.

Mixing in your moisturizer will make sure that your makeup stays longer by helping it soak into the skin. It looks sheerer and more natural, and using it this way makes it nearly impossible to get that icky cakey skin look.

When I first started getting into makeup, I was terrified of looking like I was wearing makeup. You know those people. The ones who look like they have a pound of makeup covering their skin, which only makes their flaws that much more noticeable.

My foundation wasn't really getting used until I started mixing it with my moisturizer because it felt so heavy. Even a good foundation can feel heavy for me. But this makes it light and comfortable. Sometimes, I'll have to get out of bed at night because I forgot that I was wearing makeup and so hadn't taken it off. Most people don't even know I'm wearing makeup. They just think I look airbrushed naturally. Which, hey, no complaints here!

Try out your own combinations and let me know how it works out for ya!

Thanks for reading!

Tuesday, January 22, 2013

Budget Beauty Products


Sorry for the lack of updates this past week.

Friday, during the first really big freeze in Georgia, I slipped down the stairs to my apartment and severely injured my tailbone. As a result, I haven’t been able to sit down for longer than a few minutes for several days.

Which means the segment I was going to post on Saturday has been postponed until…well, until now. And I’m changing the subject.

Because of my injury, I had to miss a day of work. Which means a tiny paycheck for me. So this little chat is going to be about budget.

Namely, how do you supply a beauty addiction with a small amount of income? Do you get substandard beauty products? Or hold off and splurge on something expensive?

There was a time when I would have said to go with drug store beauty products and just suck it up. But now, my opinion has changed. Because I realized what happens more often than not, is those substandard products don’t get used. If the concealer is cakey, or the moisturizer leaves your skin greasy, it’s going to be unused in a drawer. That’s money down the drain, even if it was super cheap.

Now, if you can find a product that’s affordable and awesome, you’ve hit the jackpot. Bask in that glory, because it doesn’t happen often.

Usually, beauty products are a case of “you get what you pay for.”

That’s why I’m more the type to spend a lot of money on one or two products, and only buy things occasionally. It’s tough saving up for something and doing without for a while, but in the long run, it’s worth it. You’ll end up with a product that is amazing, that you love, and that you’ll use regularly. And honestly, there’s nothing better than that.

For instance, there's a really great hair protecting spray on Birchbox's store right now. I have lots of points, so I can get it pretty cheaply, but I'm waiting until my bank account has recovered from Christmas. It's difficult, but I know that if I don't buy the best, it's going to end up like the hair putty that I bought ages ago: I had to throw it away because it dried up in its little container. That was a $7-8 product that just went to waste. 

And to get things more often? I recommend putting up a wishlist online. Anywhere visible really. That way, when a birthday or anniversary comes up, or your friends want to give you a gift, they can give you something you’ve had your eye on for a while.

Another tip: Like your favorite beauty suppliers on Facebook, Twitter, or Pinterest. A lot of companies have giveaways for their products and that’s a great chance to enter to win goodies. In addition, they’ll post coupons or promotional codes that can cut the price for something you really want.

Basically, you just have to be smart about it. And spend the big bucks on something you know you’ll use rather than something that might fester away in some dark corner of your bathroom.

That’s all for today. Hopefully I’ll be able to put up a longer post once my tailbone isn’t in agony. Thanks for reading!

Wednesday, January 16, 2013

Zoya Cheryl Nail Polish (And Story Time!)


As I stated in my introduction post, nail polish is what first got me into beauty products. What started as a lacquer addiction turned into something more. Something transforming.

So here, I give you Zoya Cheryl. One of the polishes I got from the Try 3 Free promotion. It’s a color I wouldn’t have paid for at the time because I didn’t know whether or not I would like it. But more on that later. For now, here’s the color:
Apologies for the terrible lighting. It has been raining in Atlanta for the past several days straight and I've had to rely completely on my desk lamp for lighting.

Zoya describes this polish as a smoky brown base completely packed with metallic copper, gold and mahogany metallic microglitter. A jeweled brown for a very rich look!

I couldn’t agree more. The color doesn’t look how I thought it would look. The brown is rich and shiny and goes on in two easy coats (like all of Zoya’s polishes). I think this would be a flattering color for pretty much every skin tone, and it especially looks great with mine.

And now it’s story time.

I wouldn’t have paid for this polish because it scared me. I love wearing brown, don’t get me wrong. But on my nails? I was worried it would look dirty or weird. Like I had dipped my nails in dirt or chocolate. But I figured that if ever there was a chance to try something out of my ordinary, it would be when it was free. So I took the dive. And it turned out brilliantly! This shimmer in this is gorgeous and I really like the way it looks on my tips.

And that’s what this whole post is about. Because let’s be honest, all those ladies out there who can paint their nails perfectly have reviews of this color. Their edges are neater. Their application less patchy. Their lighting professional. They do this for a living, or they received the color as a freebie from Zoya for marketing purposes. This isn't a new color to the world of nail polish.

But it was new for me. And I just really needed to step out of my comfort zone of greens and blues. And if you’re new to makeup/beauty/skincare/polish, I can’t recommend that highly enough. Prod the bubble until it pops and then step beyond the soapy ring that you thought was your happy place.

This blog, the beauty routine that has now become my standard, it’s all outside of my comfort zone. But I’m doing it. I’m trying new things and testing the waters and learning what does and doesn’t work. And for me, that’s the most important thing in the world. 

And if your money is tight? Don’t worry. Lots of online retailers do wonderful promotions to get some of their products moving. They’re hoping you’ll fall in love with something that you got for free and you will turn into a regular customer. And that happens really often. So if you don’t love it? Don’t feel obligated to buy it. Makeup is an evolving world and you have to constantly be learning and moving and changing, finding your go to items. 

What’s important here is trying out everything you can get your hands on because you never know what’s going to make you look and feel amazing.

There’s a big, wide world of makeup out there, you just have to take that first step outside of your normal.

Thanks for reading!

Tuesday, January 15, 2013

Setting Up Your Meez!

Five internet points if you get that reference.

For those of you who don't, it's a food service phrase. What I'm talking about is your mise en place. It's a term for your work area, the particular arrangement of food/herbs/prep items that is arranged just the way you like it. It's a sacred space and you risk bodily harm by messing up someone else's mise.

Why am I talking about food service on a beauty blog?

Because mise en place isn't just for the kitchen (or in my case, the coffee shop).

One of the best things to do with your makeup and skincare regimen is set it up in some way that it will be used. Because if it's not organized, or something gets shoved to the back of drawer, or you have to search for that cool sample a friend gave you, you're never going to like getting into makeup. It's going to feel like a chore, and that's just awful.

Trust me on this one. For most of college, I didn't wear makeup because it meant dragging my makeup bag out from the counter, digging out what I needed, putting it on, cleaning up the (shared) bathroom, and then throwing everything back in the bag for the next time. And I just wasn't feeling it. I was lazy and busy and anything that took more than a few minutes didn't make it into my schedule.

That didn't really change once I graduated college and got my own place. I have tons of sample shampoos and conditioners that I haven't tried because they're somewhere in the depths of my sink.

So, I said all of that to say this: Set. Up. Your. Station. I don't care if you live in a tiny flat in New York or a sprawling house on the West Coast. Find a corner, claim it, set up a flag, and then start building your makeup stash from the ground up.

Here, for starters, I'll show you mine.

This is one of my reused Birchboxes, which I use to hold all of my main ingredients. Everything is easy to reach, although it looks a little cluttered. 

This is the top of the above Birchbox, which I use to hold my eye shadow. I have more eye shadow palettes than anything else, so I like them to have their own container.

This is the top drawer as a whole. It looks crowded, but everything has its own place so that my routine is cut from infinite minutes to about ten. Which is useful when I'm rushing off to work or run errands.

This is the top of my sewing/makeup table. Everything that I use really often is up here, including my box of BPAL perfumes and lotions (I have such dry skin, guys). I also have a mirror, a good desk lamp, makeup removal towlettes, and a spritzer of water.

I know, I know, my collection isn't much. But it's growing. And if you're just starting out and you're looking to make a habit out of this whole prettifying thing, you're going to need your goodies set up for success.

Wow, I sounded like a high school counselor for a second there. Sorry about that.

Having your own little corner (complete with an outlet) is also great if you don't have your own bathroom or, like me, you share that bathroom with a man who wouldn't know foundation if he was bathing in it.

That's it for today. In case you can't tell, I'm starting with basics and going from there. Also, there is a cat on my lap demanding attention. Who am I to deny him?

Tomorrow, a review of a Zoya nail polish (not a new one, but it comes with a story, so there's that).

Thanks for reading!

Sunday, January 13, 2013

Birchbox January 2013 - Eyeko Eyeliner and theBalm Hot Mama


This is a twofer because I don’t have a lot to say on the Eyeko eyeliner.
 
It is a very pigmented black liquid liner with an “easy” pen applicator. It goes on super smooth, and I admit the pen tip looks like it would make life easier. However, I have the absolute worst trouble with eyeliner. I can’t seem to put it on without making the line jagged, shaky, broken up, and far too wide. I don’t know what I’m doing wrong, but I’m hoping to figure it out soon because I really like the looks of this eyeliner. Hopefully I can use it in the near future and I’ll be able to provide a better review. As it stands, I don’t have the skills to apply eyeliner properly. 
This all in one is another story completely. I only one one shade of blush, and that’s the Bare Minerals Ready shade Natural High. I like it, despite it’s hint of shimmer (I’m not a big fan of shimmers). 
So when this came I didn’t quite know how to feel about it. It looked a little too peach, a little too shimmery. But I tried it. And you know what?
I love it! The shimmer is just right and the color? Nothing to be worried about. It makes me look like I’m positively glowing. I don’t know that I’ll be wearing this a lot until it gets a little warmer (I heard on the interwebs that golden shimmers should be kept for warmer months), but I know once the sun comes out, this is will be awesome! I put a little on the apples of my cheeks and then a touch on my nose, forehead, and jawline. It makes me look like I went out in the sun yesterday, which is nice considering I haven’t seen healthy amounts of daylight in forever. 
This is definitely something I will be buying once the (generous) sample runs out. 
So happy!

Birchbox January 2013 - pūr~lisse pūr~moist


hydra-balance moisturizer
Alright, now this is something could be dangerous to my budget.
Upon opening, I immediately loved that it wasn’t really scented. Why, you ask? But Jessica, you love scented lotions! Yes. Yes, I do love scented lotions. But when I’m planning on wearing a face moisturizer to bed, I don’t want it perfumed. That’s bound to give me an instant headache and set me up for a long night of little sleep.
Instead, this smelled pleasant and clean and just like it should when all of its ingredients are super awesome natural powerhouses for hydration.
At first, I thought I had to use a lot of the moisturizer for it to soak into my skin well enough that I felt confident in the product. I later found out that I was supposed to apply a nickel sized amount (which is how much they say on Birchbox), rather than the dime sized amount I usually need with other formulas.
It soaked in really quickly, which was excellent, and didn’t make my skin feel greasy or slimy in any way. But when I woke up in the morning, my skin was so wonderfully soft. I really wish you guys could feel my face through the computer screen. I rarely feel my skin this nourished, especially during the winter.
I am absolutely going to be buying this for night time use, since I already have a day moisturizer that I adore.
Thanks for reading!

Birchbox January 2013 - Rahua Volumizing Shampoo and Conditioner


So far, this is the only thing I’ve gotten from Birchbox that I didn’t care for. I was really excited because I really love all natural shampoos. And I’ve been definitely feeling the hair oils lately, especially with winter making even my normal hair kind of dry.
But after opening it in the shower, I had to force myself to use the product. The smell was so overpowering. I can’t identify the culprit, but I just really didn’t like it. The sharp, woodsy smell, kind of like this neem hair oil I tried ages ago, made me really unhappy. And then there was this undercurrent of black licorice. Normally, I love black licorice, but this just seemed super overpowering.
And worse, it stuck around for ages. Normally, shampoo smells fade relatively quickly. But this one wouldn’t. I would catch whiffs of it every time I moved. It even lasted through the night, although by morning it had faded into something more tolerable for me.
I only used half of the sample and will be giving the rest to my best friend in the hopes that she will like it more than me.
The product itself, however, does as it is intended. My hair is soft and silky, a little shinier, and very, very voluminous. It really brought out the waves in my hair, which would be excellent for lots of people. This is by far one of the best volumizing shampoos I’ve ever used, and I would love it to bit and pieces if it weren’t for the unfortunate smell.
So if you can’t handle strong smells, this product probably isn’t for you, as it isn’t for me. But if you like that woodsy, really strong scent that smells like you’ve been clawing your way through a rainforest made of licorice, and you’re also looking for lots of volume, then this might actually be great for you!

Birchbox January 2013 - Harvey Prince Skinny Chic


Let’s start off with something simple, shall we? 
I’m a huge fan of Birchbox. I mean a HUGE fan. It’s really assisting my foray into the world of makeup and skincare and everything in between. If you’re lost in this world, you should absolutely subscribe. 
By far, Box day is my favorite day of the month. It’s like Christmas and Spa day all rolled into one. I know that I’m bound to find some favorites the ladies in New York know what they’re doing. 
In fact, I would love to work for them. Birchbox, if you’re listening, HIRE ME! ;) 
Now, on to the review. 
The first thing I am going to talk about is going to the perfume sample that I got in my Birchbox. It’s by a brand called Harvey Prince, which at first I knew nothing about. After reading the blurb on Birchbox.com, however, now I’m really excited to recommend this “company” to my friends. 
Here’s my thoughts on the perfume.
image
image
image
Harvey Prince – Skinny Chic perfume
Birchbox description: The dominant note of crisp green apple is tempered by marine mint and lovely lotus blossom. In the background, notes of grapefruit, bergamot, fennel, white cedarwood, amber, and iris mix and mingle.
Overall, this scent is exactly what it says on the label. It’s a light, delicate, young fragrance. The apple is there, but I especially smell the lotus and marine notes. Not exactly up my alley, since I usually go heavy on the foodie scents (and I generally use oil based perfumes), but this is still a really great scent. I can definitely see myself wearing this during the spring.
This fragrance does wear close to the skin, so if you’re looking for a lot of sillage, it might not be for you. I also didn’t get super long power out of it. It faded relatively quickly, but then again, my skin tends to eat floral notes faster than others. I would say this would be great sprayed into hair after a workout if you’re looking for more length. I don’t think it would weigh it down at all. More throw would also be an effect of putting it in clean hair. 
Also, as the perfume wears, the amber really comes out to play. What starts as a bright, sharp hit of floral and fruit mellows into something great for day time. It’s a simple smell that my skin and preferences just didn’t like, except for the rare spring day. But it is not by any means a bad perfume. I’m thinking about giving this one to my sister-in-law, since it suits her 15 year old sensibilities more than mine. 
Thanks for reading!